Sunday 24 April 2016

Metal Shaping

Now this part is the really fun (and really exhausting) part. All you will need is an aluminum sheet around 1 to 1.6 mm thick, the laser cut plywood template, and access to the workshop tools (and make sure to go in first because the competition for the tools is fierce) Using the plywood formwork, you can start shaping the aluminum sheet with the metal-shaping tools from the labs. There are a variety of mallets in different sizes and shapes which you could use to shape the metal. You can hit the sheets on shot bags (sand-filled bags) or dollies (t-shaped or dome-shaped metal shaping stations) and smoothen the dents out using the English wheel once you get your final form.

The best thing to do first is to cut a piece of metal that will cover the entire formwork. You can trace an outline using markers. (this will eventually fade out with all the pounding)

The hardest thing to figure out was how and where to start so in my opinion, just start pounding the aluminum sheets. It's gonna look ugly and really far from your model at first, but eventually you will get the hang of it.


I did encounter some issues with my model though. I was only able to get the 0.5 mm thick sheets which was way too thin causing the sheet to rip on some parts. For my object, which is a leaf, I realized it wasn't the best object to have modeled because the curves were way too complicated and detailed for the bossing mallets and English wheel. And my formwork lacked the exact detail for the skin to actually adhere to. I was only able to use it to follow the basic contour of the leaf model but had to make the details up myself. (I should have worked on a better 123D Make model)


Still, I just tried to copy the form and contours of the actual leaf using the tools from the workshop. I mainly just used the finest bossing mallet to hit it on a tapered T-Dolly to create the curves and other details of my form. I also realized at this point that I had to be really careful on hitting the sheet as I wouldn't be able to use the English wheel smoothen the dents. 


Laser Cutting

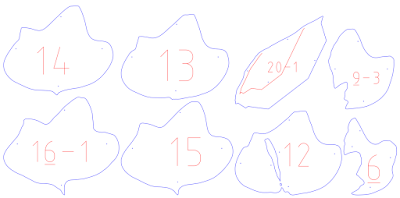
The next part is the start of the fun part! Once you have the PDF files of your templates, the next step is to have them laser cut. You will need to change the settings of the exported files using Adobe Illustrator. 

First thing you need to change is the outline color. You have to make sure that the outline of the templates you want to actually be cut are red, and the ones you want to just be scratched are blue (usually the scratched surfaces serve as guides for when you put the pieces together)

The other thing would be the line weights. You should change the strokes to .001 (if you don't want the laser cutting to take forever)


After changing all the settings on Illustrator, it's time to laser cut. You just need to save your PDF files on the labs and make sure you modify the settings for the laser cutting machines. Choose the appropriate material and thickness of the sheet you are cutting and make sure that the laser cutters are on focus and are cutting inside the sheet. 


For my templates, I chose the 600 x 300 x 3 mm plywood sheets. (it is good to check the quality of the plywood and make sure it's not bent so that it actually cuts through the sheet)


Saturday 23 April 2016

123D Make

After finishing the model on 123D Catch, the next step is to make patterns of the formwork through 123D Make. This app helps you create templates of your model which you could laser cut and assemble in order to make a formwork where you will be able to hammer on your metal sheet. 

First thing you need to do is to load your model using the 123D Catch app on your laptop. Check and make sure that you are satisfied with your model. If not, there are various apps that could help you clean or fix it like the Mesh Mixer app (or you could start taking photos over again if you have so much time). After that, you can export your capture as an object (.obj) file.

Like 123D Catch, 123D Make is totally free. Just sign in on your Autodesk or Facebook account to save and access your works.

1. Open the object file on 123D Make.


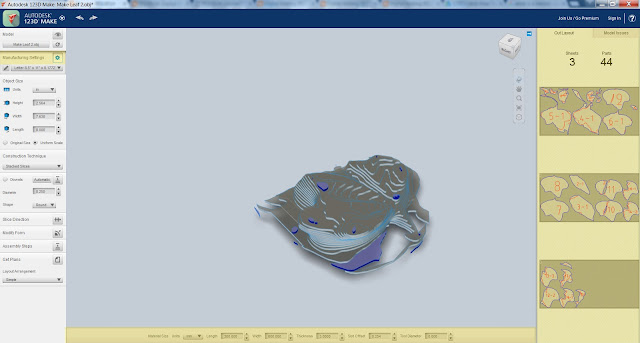
This will give you a rough image of your model just like the picture above. Because the object that I chose is not a solid form and more like a sheet, I decided not to delete the excess bits of the model to create a solid contour that I could hammer on.

2. Change Manufacturing Settings.


On the left side panel of the app, you will be able to change the manufacturing settings. This lets you change the size and scale of your object, the sheet properties, and the selected construction technique.

If you click the drop-down button that says 'Select Technique', you will see various construction methods that you could choose from for your templates.


If you click on the gear button beside 'Manufacturing Settings', a panel on the bottom part of the screen would pop up. This lets you define the sheet properties depending on the dimensions, type, and thickness of your material. After specifying the properties, the app would determine the number of sheets and templates for you according to the construction technique that you prefer.


3. Choose construction technique for your template.

If you click the drop-down button that says 'Select Technique', you will see various construction methods which include the following:

Stacked Slices


Interlocked Slices


Curves


Radial Slices


Folded Panels


For my model, I thought the stacked slices would be the best option as it would resist stress from hammering better than the other techniques. 

4. Define the settings of your template


On the same left settings panel, you will be able to define the number of templates for your model. You could add more pieces to make the formwork more sturdy. And you could also modify the form of your template.

5. Get the plans!


The final step for this process is to export the PDF sheets. Just click on the 'Get Plans' button and save them as PDF files. You will need these sheets for the next process which is laser cutting. 

123D Catch

Using Autodesk's 123D Catch app, (which is downloadable on smartphones or directly on computers) you can easily make a 3D model of any object that you like. Basically, you take a series of  photos of an object from different angles, enough for it to recognize the object on various points and generate a 3D version of it. This is called photogrammetry.

The app is totally free. So, you would just need an Autodesk or even just a Facebook account to save and access your works.


Before you start modeling your final object, you can start practicing first on other objects for you to have pro skills. (I practiced on random stuff like an umbrella I found on Red Centre and my bag, before finally modeling my leaf)


1. Take photos of your object from different angles.


I found it easier to use my phone in taking pictures of the object but easier to navigate and clean it up on my laptop. For best results, it's important that you don't capture too much of the background and that you keep the object still and in good lighting. (It's good to lay it on a paper sheet.) And make sure to avoid reflective surfaces.

2. Upload the photos to generate the model 


After taking the photos, submit them! The app will start transmitting and processing the photos, and finally start generating the 3D model. (Now, this could take forever so just be patient. Chill. Take a nap.) You could also start another capture while you're waiting for the other one to be finalized.

3. Navigate through (be amazed by) your finished model.


The finished model will give you access to orbit around the object. This will allow you to see if there are any errors (usually because of bad photography skills) You could also download the Mesh Mixer app to clean and remove unnecessary bits of the model. If you're not satisfied with the model, you could retake the photos and start over but be sure to have master photography skills this time. If you're satisfied then, congratulations!!! You can read my next blog entry.

And make sure to save your model!

Leaf & Architecture

First task of the assignment is to choose an object that reflects the student's discipline, which in my case is architecture.


I was having a hard time choosing an object since you can basically try and relate anything to architecture, and then finally ended up with a leaf. (perfect timing since it's fall). Aside from the fact that a leaf has these random curves and edges which I thought would look good if modeled in an aluminum sheet, these natural elements have a huge impact on building design. Not just by adding warmth and a sense of life in a building (or really to just hide a very unpleasant portion of a building), it could also function as a thermal comfort or a defined landscape feature. Just think about it, building with a natural element versus a building without a natural element.

So I (randomly picked up a leaf on campus) took pictures of it on different angles to show the curves of its surface.